For tumbler recommendations, see our best rock tumblers in 2026.
Why Your Rock Tumbler Sounds Like a Jackhammer
Let’s be honest: rock tumblers are loud. If you’ve got one running in your basement, garage, or spare room, you already know the struggle. That constant rumbling and grinding noise runs 24/7 for weeks at a time, and it’s a legitimate quality-of-life issue for you and everyone else in your home.
The noise comes from a few sources. Rotary tumblers have a motor that spins a heavy barrel full of rocks and media. That’s already a lot of vibration. Add in the friction of thousands of rocks tumbling against each other and the ceramic or steel media, and you’ve got a sound that doesn’t really stop. Vibration tumblers are often louder because they’re literally shaking thousands of times per second. Neither option is whisper-quiet.
The real problem is that most guides ignore this entirely. They’ll tell you about grit sizes and tumbling times, but nobody mentions that you might need earplugs to live in the same house as your tumbler. This post addresses what everyone’s thinking but not talking about.
Understanding Noise Levels Across Different Tumblers
Not all tumblers are created equal when it comes to noise. Some models are significantly louder than others, and knowing which ones you’re dealing with helps you pick the right dampening strategy.
Rotary Tumblers: The Moderate Offenders
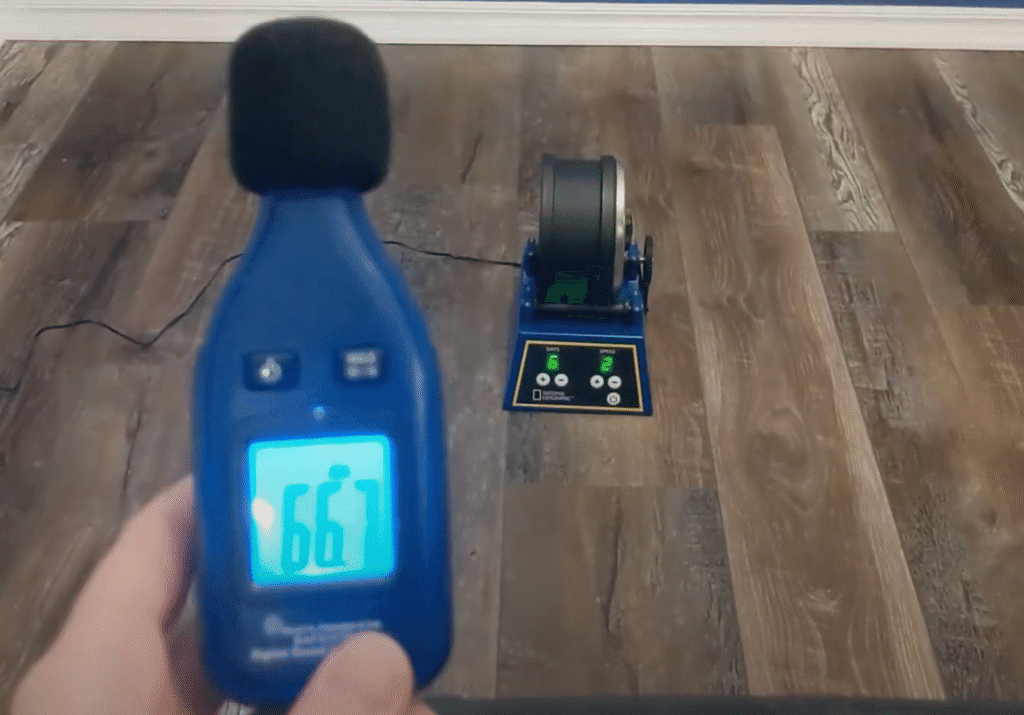
Most rotary tumblers produce noise in the 50-65 decibel range. That’s about as loud as a running vacuum cleaner or a moderately busy restaurant. The National Institutes of Health considers sustained exposure above 85 decibels risky, so you’re in that borderline zone where it’s uncomfortable but not immediately dangerous.
The better news is that rotary tumblers tend to be more consistent. The noise level stays relatively stable because the barrel spins at a steady speed. There are fewer abrupt rattles or vibrations compared to their vibration counterparts.
Vibration Tumblers: The Loud Ones
Vibration tumblers typically run 70-80+ decibels, with cheaper models hitting the higher end of that range. That’s noticeably louder and more irritating because the sound has a buzzing, almost jackhammer-like quality rather than a smooth rumble. The high-frequency vibrations create noise that carries through walls more easily.
Vibration tumblers are also less predictable noise-wise. They can rattle against whatever surface they’re sitting on, create resonance in cabinets or shelves, and send vibrations through your entire house if they’re not properly isolated.
Premium vs. Budget Models
Here’s an underrated factor: better-quality tumblers with improved motors and barrel design tend to be quieter. You’re not just paying for durability; you’re paying for better engineering that reduces noise. Budget tumblers often skimp on vibration dampening built into the machine itself, which means you’ll have to do more work afterward.
DIY Soundproofing Enclosures That Actually Work
Building a soundproofing box around your tumbler is one of the most effective solutions. It’s not complicated, and you don’t need to be handy to pull it off.
The Basic Setup
You’ll need a wooden frame (plywood works great), acoustic foam panels or mass-loaded vinyl, and basic fasteners. The goal isn’t complete silence, but rather reducing noise by 10-20 decibels, which makes a massive difference in how the sound feels in your space.
Start by building a simple box frame large enough to fit your tumbler with at least 6 inches of clearance on all sides. Ventilation matters here because tumblers generate some heat. You don’t want to trap that in an enclosed space.
The Layering Strategy
Don’t just throw foam at the problem. The most effective approach uses multiple layers:
- Inner layer: Acoustic foam panels (2-4 inches thick) absorb mid and high-frequency noise
- Middle layer: Mass-loaded vinyl (1-2 pounds per square foot) blocks low-frequency rumbling
- Outer layer: Plywood or MDF board for structural integrity
Acoustic foam alone won’t stop low-frequency rumbling. Mass-loaded vinyl alone won’t handle the higher frequencies. Together, they handle the full spectrum of tumbler noise.
Ventilation and Access
Add a hinged door or removable panel on one side so you can easily access your tumbler for maintenance. Install small vents (covered with acoustic duct wrap) at opposite corners to allow air circulation and heat dissipation. You want passive airflow, not active cooling, so keep vents small.
Vibration Isolation: The Underrated Solution
Vibration isolation pads are your secret weapon against noise transmission through your house. When your tumbler sits directly on concrete, wood, or tile, it vibrates those surfaces, which act like amplifiers. Isolation pads break that connection.
How to Choose the Right Pads
You want isolation pads rated for your tumbler’s weight. Most tumblers weigh 30-50 pounds when full, so look for pads rated to handle at least 100-150 pounds. Rubber-based isolation pads work well for most home setups. Neoprene, elastomer, or specialized vibration isolation materials are worth considering if you’re dealing with a heavier vibration tumbler.
Place pads at all four corners of your tumbler’s base. If you’re using a stand or shelf, put isolation pads under each leg of the stand as well. The more connection points you isolate, the less vibration travels into your floor.
Real-World Impact
Isolation pads alone typically reduce noise by 5-10 decibels. That doesn’t sound like much on paper, but in practice, it means your upstairs neighbor stops complaining. Combine them with a soundproofing enclosure, and you’re looking at 20-30 decibels of reduction, which is genuinely significant.
Placement Strategy: Location Matters More Than You Think
Where you put your tumbler shapes how much noise affects your household. The right placement can be as effective as some dampening solutions.
Basements Over Bedrooms
If you have a basement, that’s your best location. Basement walls are typically thicker, and putting your tumbler in a corner away from the stairs minimizes sound traveling upward. If you have to use an upstairs room, avoid placing it directly above someone’s bedroom or under someone’s sleeping area.
Interior Walls vs. External Walls
Place your tumbler against an interior wall if possible, not an exterior wall. External walls often have less insulation and transmit sound to the outside more easily. You might think your neighbors won’t hear it, but sound travels surprisingly far through walls and foundations.
Distance Counts
Every three feet of distance between your tumbler and living spaces reduces perceived noise. If you can tuck it away in a garage corner instead of a spare bedroom, do it. Sound intensity decreases with distance, so even moving your tumbler 10 feet away makes a noticeable difference.
Quieter Tumbler Alternatives to Consider
If you’re starting fresh and noise is a deal-breaker, knowing which models are genuinely quieter helps you make a better choice from the start.
Premium Rotary Models
Mid to high-end rotary tumblers with brushless motors and improved barrel designs run noticeably quieter than budget options. Models from established manufacturers often include better vibration dampening built into the frame. Yes, they cost more upfront, but the noise reduction is real.
Smaller Capacity Tumblers
Counterintuitive but true: smaller tumblers are often quieter because there’s less mass and friction. A 1-pound tumbler won’t be silent, but it’ll be significantly quieter than a 6-pound tumbler. The trade-off is batch size, but if you’re willing to do more frequent smaller batches, the noise reduction is worth it.
This is one reason choosing the right tumbler for your needs matters beyond just finish quality. Think about your household’s noise tolerance before committing to a particular model.
Tumbling During Low-Activity Hours
If your tumbler is already purchased, consider running it during hours when noise matters less. Running your tumbler during the day instead of at night, or on weekends instead of weekdays, can reduce conflict even if the noise level stays the same. This isn’t a permanent solution, but it’s worth mentioning as a practical compromise.
Combining Solutions for Maximum Quiet
The best approach layers multiple strategies. You’re not choosing between soundproofing and isolation pads; you’re using both.
Here’s a practical setup that works:
- Place vibration isolation pads under your tumbler base
- Build or purchase a soundproofing box with acoustic foam and mass-loaded vinyl
- Position the enclosure in the quietest part of your home (basement corner, garage interior wall)
- Run the tumbler during hours when household activity is highest, masking residual noise
This combination typically reduces noise by 50%. That’s a whisper-to-normal-conversation-level reduction. You’ll still know your tumbler is running, but it won’t dominate your living space.
The Bottom Line
Rock tumbler noise is a real problem that deserves real solutions. You’re not being unreasonable if you’re tired of the constant rumbling. Invest in isolation pads (they’re cheap), build or buy a soundproofing enclosure (total cost is usually under 100-200 dollars), and place your tumbler thoughtfully. These steps together transform tumbling from an annoying household disturbance into something you can actually live with long-term.
If you’re buying your first tumbler, prioritize models with better noise ratings. If you already own a loud one, dampening solutions work. Either way, you don’t have to choose between beautiful polished stones and a peaceful home.