Updated for 2026. The difference between cloudy, hazy stones and a mirror-like glass finish almost always comes down to one thing: your grit and polish. The tumbler does the work, but the compounds you feed it determine the result.
This guide covers every grit and polishing compound used in rock tumbling — what each one does, when to use it, how much to use, and which products are worth buying. Whether you’re running your first batch or trying to troubleshoot a disappointing polish, you’ll find the answer here.
What Do You Need Right Now?
- Starting your first batch? Get a complete 4-stage grit kit on Amazon — all four grades in one package, no guessing. See the Complete Kits section for alternatives.
- Just need the right polish? Jump to Aluminum Oxide (all-purpose), Tin Oxide (mirror finish), or Cerium Oxide (quartz & glass).
- Running out of a specific grit? Skip to Silicon Carbide Grit for the right grade and quantity.
- Want a reliable tumbler to run it in? See our 10 tested rotary tumblers across every budget.
The Four-Stage Tumbling Process
Before diving into specific compounds, it helps to understand the overall process. Rock tumbling uses progressively finer abrasives across four stages, each one removing the scratches left by the previous stage:
- Stage 1 — Coarse Grind (60/90 grit): Shapes the rocks, removes rough edges and surface imperfections. The most aggressive stage. Runs 7-10 days.
- Stage 2 — Medium Grind (120/220 grit): Smooths the surface left by coarse grinding. Removes the deep scratches. Runs 7 days.
- Stage 3 — Pre-Polish (500/600 grit): Creates a satin-smooth surface and prepares stones for the final polish. Runs 7 days.
- Stage 4 — Final Polish: Uses a polishing compound (not grit) to achieve the high-gloss mirror finish. Runs 7 days.
Critical rule: You MUST clean everything thoroughly between stages. Even a single grain of coarse grit carried into Stage 4 will scratch your stones and ruin weeks of work. Rinse the barrel, lid, rocks, and your hands between every stage change.
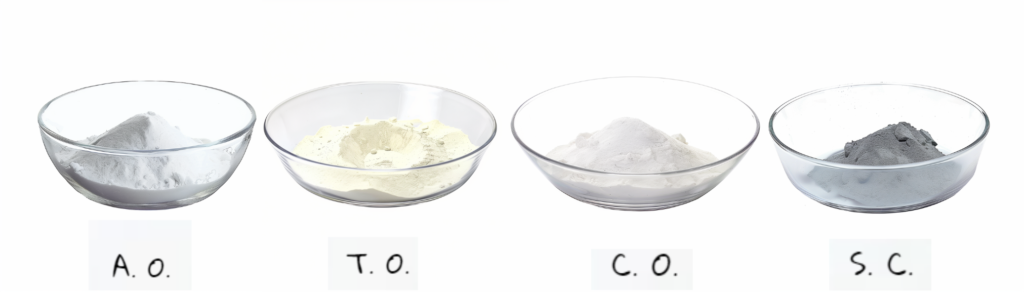
Silicon Carbide Grit (Stages 1-3)
Silicon carbide (SiC) is the standard abrasive for the first three stages of rock tumbling. It’s harder than most rocks you’ll tumble (9.5 on the Mohs scale, just below diamond), which means it cuts efficiently through quartz, agate, jasper, and other hard stones.
Stage 1: Coarse Grit (60/90 mesh)
This is the workhorse — the coarsest grit that does the heavy lifting. It grinds away rough surfaces, rounds edges, and shapes your stones. Use 2 tablespoons per pound of rock in your barrel. The slurry will look thick and dark gray.
How long: 7 days minimum. Check after 7 days — if stones still have rough spots or pits, add fresh grit and run another 3-5 days. Hard stones like agate may need 10-14 days total.
Stage 2: Medium Grit (120/220 mesh)
Smooths the surface left by coarse grinding. The scratches become much finer and the stones start to feel smooth to the touch. Use 2 tablespoons per pound of rock. Run 7 days.
Stage 3: Pre-Polish (500/600 mesh)
Also called “fine grit” or “pre-polish grit.” Creates a satin-smooth surface that’s ready for the final polish. After this stage, stones should feel glass-smooth with no visible scratches. Use 2 tablespoons per pound of rock. Run 7 days.
Pro tip: If stones still feel gritty or scratchy after Stage 3, do NOT proceed to Stage 4. Run Stage 3 again with fresh grit. Moving to polish with scratched stones is the #1 cause of disappointing results.
Final Polish Compounds (Stage 4)
Stage 4 is where the magic happens. Instead of abrasive grit, you use a polishing compound that creates the mirror-like finish. There are several options, and the right one depends on what type of stones you’re polishing.
Aluminum Oxide (Best All-Around Polish)
Best for: Agate, jasper, quartz, petrified wood, most common tumbling stones
Aluminum oxide is the go-to polish for most rock tumblers. It works beautifully on virtually all stones with a Mohs hardness of 6-8, which covers the vast majority of what hobbyists tumble. It’s affordable, widely available, and produces consistently excellent results.
Use 2 tablespoons per pound of rock. The polish comes as a fine white or light gray powder. Mix it into the barrel with water and run for 7 days. The resulting finish on agate and jasper is genuinely stunning — a deep, glossy shine that shows off the stone’s colors and patterns.
Our recommendation: If you only buy one polish, make it aluminum oxide. It handles 90%+ of the stones most hobbyists tumble.
Tin Oxide (Premium Mirror Finish)
Best for: Obsidian, opal, softer stones, show-quality specimens
Tin oxide produces the highest-quality polish available — a true optical-grade mirror finish. It’s the compound of choice when you want to achieve the absolute best result on a special stone. The finish on obsidian with tin oxide is spectacular — a deep, liquid-glass shine that aluminum oxide can’t quite match.
The downside is cost — tin oxide is 3-5x more expensive than aluminum oxide per pound. It’s also slightly slower-acting. For everyday batches, aluminum oxide is fine. Save tin oxide for your best specimens and softer stones where it truly shines.
Use 1-2 tablespoons per pound of rock. Run 7-10 days.
Cerium Oxide (Glass and Quartz Specialist)
Best for: Clear quartz, glass, agate, chalcedony
Cerium oxide comes from the optical lens industry, where it’s used to polish glass to perfection. That same property makes it excellent for quartz-family stones and any silica-based material. It produces an exceptionally clear, bright finish on translucent stones.
Cerium oxide works through a chemical-mechanical process — it doesn’t just abrade the surface, it actually chemically bonds with silica to create an incredibly smooth finish. This makes it particularly effective on stones where you want maximum clarity and light transmission.
Price is moderate — more than aluminum oxide, less than tin oxide. Use 1-2 tablespoons per pound of rock. Run 7 days.
TXP and Rapid Polish (Speed Polish Options)
Best for: Experienced tumblers who want faster results
TXP (Tripoli Extra Polish) and similar “rapid polish” products are formulated for faster action. They can achieve a good polish in 3-5 days instead of the standard 7. The trade-off is that they may not produce quite as deep a shine as a full 7-day run with aluminum oxide.
These work best in vibratory tumblers where the faster tumbling action complements the rapid-acting compound. In rotary tumblers, the standard compounds with a full 7-day cycle usually produce superior results.
Which Polish for Which Stone?
| Stone Type | Recommended Polish | Notes |
|---|---|---|
| Agate | Aluminum Oxide | Standard choice, excellent results |
| Jasper | Aluminum Oxide | Works beautifully on all jasper varieties |
| Quartz (clear/rose/smoky) | Cerium Oxide | Best clarity on translucent quartz |
| Obsidian | Tin Oxide | Produces the deepest mirror finish |
| Petrified Wood | Aluminum Oxide | Standard polish works great |
| Tiger’s Eye | Aluminum Oxide | Brings out the chatoyancy beautifully |
| Amethyst | Cerium Oxide | Quartz family — cerium gives best clarity |
| Opal | Tin Oxide | Gentle polish for softer material |
| Moonstone/Feldspar | Tin Oxide or Aluminum Oxide | Either works; tin for best results |
| Lapis Lazuli | Aluminum Oxide | Standard polish, gentle pressure |
Buying Grit and Polish: What to Look For
You have two main options for purchasing tumbling compounds:
Complete Grit Kits
The easiest option for beginners. A grit kit includes all four stages in pre-measured amounts for a specific barrel size. Most kits cost $15-25 and contain enough compound for one complete tumbling cycle in a 3-pound barrel. 4-step grit kits from brands like Polly Plastics, MJR, and National Geographic are reliable choices. For a larger supply, this 4.5 lb grit and polish refill set is excellent value.
Buying in Bulk
Once you’re running regular batches, buying grit by the pound is significantly cheaper. A 1-pound bag of coarse grit costs about $8-12 and lasts for multiple batches. Buy each stage separately and measure your own amounts. This is how experienced tumblers save money long-term.
Storage tip: Keep grit in labeled, sealed containers. Store each stage separately and far apart — you do NOT want coarse grit accidentally getting into your polish container. Many tumblers use color-coded containers for each stage.
Don’t Forget Ceramic Media
Ceramic tumbling media isn’t a polish, but it’s essential for getting a great finish. These small ceramic cylinders or pellets serve three purposes:
- Filling barrel space: Your barrel needs to be 2/3 to 3/4 full. If you don’t have enough rock, ceramic media fills the gap and ensures proper tumbling action.
- Cushioning: Media prevents large stones from chipping each other during tumbling.
- Delivering grit: Media gets between stones and carries grit and polish into areas that stone-on-stone contact might miss.
Use ceramic media in Stages 3 and 4 especially. Some tumblers use it in all four stages. A 2-pound bag of ceramic media costs about $10-15 and lasts for many batches (just rinse between stages).
Troubleshooting Common Polish Problems
- Stones are cloudy after Stage 4: Grit contamination is the most likely cause. A single grain of coarse grit in your polish stage will scratch every stone. Clean EVERYTHING between stages. Run Stage 4 again with fresh polish in a thoroughly cleaned barrel.
- Polish won’t stick / stones still look matte: The stones may not have been smooth enough after Stage 3. Go back to Stage 3 with fresh grit, then re-run Stage 4.
- Some stones polished, others didn’t: Mixing stones of different hardness causes this. Harder stones polish before softer ones. Tumble stones of similar hardness together. See our troubleshooting guide for more fixes.
- Good polish but fades after drying: Some stones look wet-polished but dry dull. Apply a light coat of mineral oil or Renaissance wax to maintain the wet look. See our display guide for more on stone care.
Frequently Asked Questions
What is the best polishing compound for rock tumbling?
Aluminum oxide is the best all-around polish for rock tumbling. It works on 90%+ of stones hobbyists tumble, including agate, jasper, quartz, and petrified wood. For the absolute best finish on special specimens, tin oxide produces a superior mirror polish but costs 3-5x more.
How much grit do I need per batch?
Use 2 tablespoons of grit or polish per pound of rock in each stage. For a standard 3-pound barrel, that’s about 6 tablespoons per stage. A pre-measured grit kit ($15-25) contains enough for one complete four-stage cycle in a 3-pound barrel.
Can I reuse rock tumbling grit?
No. Grit breaks down during tumbling and becomes less effective. Always use fresh grit for each stage. The slurry from each stage should be disposed of (NOT down the drain — it clogs pipes). Let it settle in a bucket, pour off the water, and throw the sludge in the trash.
Why are my polished rocks still cloudy?
The most common cause is grit contamination — coarse grit carried into the polish stage scratches the surface. Clean the barrel, lid, and all stones thoroughly between every stage. If stones are already cloudy, clean everything and re-run Stage 4 with fresh polish. If that doesn’t work, go back to Stage 3 and re-run both stages.
What’s the difference between silicon carbide and aluminum oxide?
Silicon carbide is an abrasive grit used in Stages 1-3 to grind and shape stones. Aluminum oxide is a polishing compound used in Stage 4 to create the final shine. They serve completely different purposes in the tumbling process — you need both.
Compounds work best in a quality tumbler. See our best rock tumblers guide for the top picks.