Updated for 2026. Rock tumbling is one of the most satisfying hobbies you can pick up. You start with rough, ugly rocks and — after a few weeks of patience — end up with polished gems that look like they belong in a jewelry store. No artistic skill required, no expensive studio, just a tumbler, some grit, and time.
This guide walks you through everything you need to know to go from zero to your first batch of polished stones. We’ll cover what equipment to buy, how the process works step-by-step, what rocks to start with, common mistakes to avoid, and what to do with your finished stones.
What is Rock Tumbling?
Rock tumbling is a process that replicates what nature does over thousands of years — smoothing and polishing stones through friction. In nature, river rocks get their smooth, rounded shape from tumbling against each other in flowing water. A rock tumbler does the same thing in your garage, just much faster.
The tumbler rotates a barrel filled with rocks, water, and abrasive grit. Over several weeks, progressively finer grit smooths the surface until a final polishing compound produces a glass-like shine. The result? Stones that reveal hidden colors, patterns, and beauty that were invisible in their rough state.
It’s a hobby that works for all ages — kids love the “magic” of transformation, and adults get hooked on finding and polishing increasingly beautiful stones. The startup cost is modest ($60-200), ongoing costs are low ($5-10 per batch), and the results are genuinely impressive.
What You Need to Get Started
1. A Rock Tumbler
This is your main investment. There are two types:
- Rotary tumblers spin the barrel continuously. They’re simpler, quieter, more affordable, and ideal for beginners. A complete cycle takes 4-6 weeks. Start here.
- Vibratory tumblers vibrate the stones against each other. They’re faster (1-2 weeks) but more expensive and better suited as a second machine for experienced tumblers.
Our beginner recommendations:
- Best starter kit: National Geographic Hobby Rock Tumbler Kit (~$60-70) — includes everything: tumbler, rocks, grit, jewelry settings
- Best long-term value: Lortone 3A (~$140-180) — quiet, durable, lasts 5-10+ years
- Best overall: Thumler’s A-R1 (~$130-180) — heavy-duty metal frame, built to last
See our full entry-level tumbler comparison and top 10 tumblers for every budget for detailed reviews.
2. Tumbling Grit (4 Stages)
Grit is the abrasive that does the actual smoothing and polishing. You’ll need four progressively finer stages:
- Stage 1 — Coarse grit (60/90 silicon carbide): Shapes and rounds the stones
- Stage 2 — Medium grit (120/220 silicon carbide): Smooths the surface
- Stage 3 — Pre-polish (500/600 silicon carbide): Creates a satin-smooth finish
- Stage 4 — Polish (aluminum oxide): Produces the final mirror-like shine
The easiest option for beginners is a complete grit kit ($15-25) that includes pre-measured amounts of all four stages. If your tumbler came as a kit, grit is usually included for your first batch.
See our complete grit and polish guide for detailed information on compounds, amounts, and which polish works best for different stones.
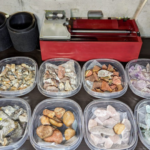
3. Rocks to Tumble
For your first batch, start with stones that are known to tumble well:
- Agate — The king of tumbling stones. Produces a spectacular polish with beautiful color patterns. See our complete agate tumbling guide.
- Jasper — Comes in many colors and varieties, tumbles beautifully and reliably.
- Tiger’s eye — Produces a stunning chatoyant (cat’s eye) effect when polished.
- Petrified wood — Fascinating patterns and colors, polishes well.
- Rose quartz — Beautiful pink color, easy to tumble.
Important rule: Only tumble rocks of similar hardness together. Mixing hard and soft stones means the soft ones get destroyed while the hard ones barely change. All the stones listed above are in the 6.5-7 range on the Mohs hardness scale, so they can be mixed together safely.
You can buy beginner-friendly rough rock kits online, or — even better — collect your own rocks from riverbeds, beaches, and hiking trails. Learning to identify rocks suitable for tumbling is half the fun.
4. Ceramic Media (Optional but Recommended)
Small ceramic cylinders that serve as cushioning, filler, and grit carriers. They’re especially useful in Stages 3 and 4 to protect your stones and deliver polish into crevices. A $10-15 bag lasts many batches. Not strictly required for your first batch, but they noticeably improve results.
5. Water
Plain tap water, added to the barrel with the grit. That’s it.
Your First Batch: Step-by-Step
Here’s exactly what to do from unboxing to polished stones:
Step 1: Load the Barrel
Fill the barrel 2/3 to 3/4 full with rocks of similar size and hardness. This fill level is critical — too little and the stones bang instead of grinding; too much and they can’t tumble properly. If you don’t have enough rock, add ceramic media to reach the right level.
Step 2: Add Coarse Grit and Water
Add 2 tablespoons of coarse grit (60/90) per pound of rock. Then add water until it just reaches the bottom of the top layer of rocks — don’t submerge them completely. Seal the barrel tightly.
Step 3: Tumble for 7 Days (Stage 1)
Place the tumbler somewhere you can tolerate continuous noise for a week (garage, basement, closet). Let it run 24/7. Check after 2-3 days to make sure the barrel hasn’t leaked and the motor isn’t overheating. After 7 days, open the barrel and inspect the rocks. They should have smooth, rounded edges with no sharp points. If they still have rough spots, add fresh grit and run another 3-5 days.
Step 4: Clean EVERYTHING
This is the most important step and where most beginners make mistakes. Dump the slurry into a bucket (NEVER down the drain — it will clog your pipes). Rinse every rock individually under running water. Scrub the barrel inside and out. Clean the lid and gasket. Wash your hands. Even a single grain of coarse grit carried forward will scratch your stones in later stages.
Let the slurry settle in the bucket, pour off the water, and throw the sludge in the trash.
Step 5: Repeat for Stages 2 and 3
Load the clean rocks back into the clean barrel. Add medium grit (120/220), water, and tumble for 7 days. Clean everything again. Then repeat with pre-polish grit (500/600) for another 7 days. After Stage 3, your rocks should feel glass-smooth with no visible scratches. If they still feel gritty, run Stage 3 again — do NOT proceed to polish with scratched stones.
Step 6: Final Polish (Stage 4)
Extra-thorough cleaning is essential before this stage. Load the clean rocks with 2 tablespoons of aluminum oxide polish per pound of rock. Add ceramic media if you have it — it helps deliver polish and cushion the stones. Add water and tumble for 7 days.
Step 7: The Big Reveal
Open the barrel, rinse the stones, and dry them off. You should see a beautiful glossy shine that reveals colors and patterns you couldn’t see in the rough stone. Congratulations — you’ve just tumbled your first batch!
7 Mistakes Every Beginner Makes (And How to Avoid Them)
- Not cleaning between stages. This is mistake #1. Grit contamination ruins everything. Clean obsessively.
- Mixing rocks of different hardness. Soft stones get destroyed while hard stones barely change. Tumble similar hardness together.
- Under-filling the barrel. Rocks need to be 2/3 to 3/4 full to tumble properly. Too few rocks = bruising, not grinding.
- Rushing to Stage 4. If stones aren’t smooth after Stage 3, re-run it. Polishing scratched stones just gives you shiny scratched stones.
- Pouring slurry down the drain. Rock dust settles into a concrete-like sludge in your pipes. Always dispose in the trash.
- Using too much water. Water should reach the bottom of the top rock layer, not cover everything. Too much water reduces grinding action.
- Being impatient. The full process takes 4-6 weeks. There are no shortcuts. But the wait is absolutely worth it.
What to Do With Your Polished Stones
Now you’ve got a handful of beautiful polished stones. Here are some popular options:
- Display them. Glass jars, shadow boxes, floating shelves, or a proper display cabinet. See our 10 creative display ideas for inspiration.
- Make jewelry. Wire wrapping is the easiest technique — wrap copper or silver wire around a stone to make a pendant. Cage pendants are even simpler.
- Give them as gifts. Polished stones from someone’s own collection are uniquely personal gifts. Mount them on pendant cards or display in small boxes.
- Sell them. Etsy, craft fairs, and local markets are great outlets for tumbled stones, especially unique varieties. See our guide to selling tumbled stones.
- Start collecting. Most tumblers quickly become collectors, seeking out specific stone types, colors, and patterns from different locations.
What Does Rock Tumbling Cost?
Rock tumbling is one of the most affordable hobbies around:
- Starter tumbler + kit: $60-200 (one-time purchase)
- Grit kit per batch: $15-25 (or $8-12/lb buying in bulk)
- Rough rock: Free (collected) or $5-15 per pound (purchased)
- Ceramic media: $10-15 (lasts many batches)
- Electricity: ~$1-2 per month (a tumbler uses about as much power as a light bulb)
After the initial tumbler purchase, you’re looking at roughly $5-10 per batch in grit and polish. That’s a lot of beautiful stones for very little money.
Ready to Level Up?
Once you’ve completed your first batch, here are some great next steps:
- Learn to identify rocks suitable for tumbling
- Tumble challenging stones like obsidian and quartz
- Advanced tumbling techniques for perfect polish
- Master grit and polish selection
- Troubleshoot cloudy or hazy results
Welcome to rock tumbling — you’re going to love it. Happy tumbling!
Frequently Asked Questions
How long does rock tumbling take?
A complete rotary tumbling cycle takes 4-6 weeks. There are four stages of roughly 7 days each: coarse grind, medium grind, pre-polish, and final polish. Some harder stones may need extra time in the coarse stage. Vibratory tumblers can finish in 1-2 weeks but cost more and are better suited for experienced users.
What rocks are best for beginners to tumble?
Start with agate, jasper, tiger’s eye, petrified wood, or rose quartz. These are all in the 6.5-7 Mohs hardness range, widely available, and produce beautiful results consistently. Avoid soft stones (calcite, fluorite) and very hard stones (corundum, topaz) until you have more experience.
Is rock tumbling loud?
It depends on the tumbler. Budget models can be as loud as a dishwasher running continuously. Quality tumblers with rubber barrels (Lortone 3A, Thumler’s A-R1) are noticeably quieter — comparable to a quiet conversation. Most hobbyists place their tumbler in a garage, basement, or closet. A towel or rubber mat underneath helps dampen vibration noise.
How much does it cost to start rock tumbling?
You can start for as little as $60-70 with a National Geographic kit that includes everything. A quality tumbler that lasts years costs $130-200. Ongoing costs are about $5-10 per batch for grit and polish. Rough rock can be collected for free or bought for $5-15 per pound. It’s one of the most affordable hobbies you can pick up.
Can kids do rock tumbling?
Absolutely — it’s a fantastic STEM activity for kids ages 8 and up. The National Geographic Hobby Kit is specifically designed for younger users with easy-to-follow guides and a complete kit. Kids learn patience, geology concepts, and the satisfaction of creating something beautiful. Younger children may need help with loading/unloading the barrel and cleaning between stages.
Once you have everything set up, our step-by-step guide to using a rock tumbler walks you through the full process from loading to polishing.
Curious about what actually happens inside the barrel? Our deep dive into how rock tumblers work explains the science behind every stage.
Curious about how much electricity your tumbler actually uses? Check our detailed breakdown of rock tumbler electricity costs.