For tumbler recommendations, see our best rock tumblers in 2026.
Your first batch of rough rocks just arrived, the tumbler is sitting on the counter, and you’re staring at four bags of mysterious gray powder wondering what happens next. Sound familiar?
Rock tumbling is one of the most satisfying hobbies you can pick up. You take ugly, dull rocks and turn them into glossy gemstones over the course of a few weeks. But that “few weeks” part trips up a lot of beginners. Skip a step or rush the process, and you end up with scratched, cloudy stones instead of the mirror finish you were hoping for.
This guide walks you through every stage of the rock tumbling process, from loading your first barrel to pulling out polished gems. No vague advice, no skipped steps. Just the exact process that actually works.
What You Need Before You Start
The Three Inputs That Matter Most
Good technique only goes as far as your gear will allow. These three inputs drive 80% of tumbling results:
- Quality polishing compound — fresh, graded polish separates glossy stones from hazy ones. Tested compound picks with Amazon prices
- Durable ceramic media — cheap media crumbles and cross-contaminates stages. Best ceramic media guide
- A reliable rotary tumbler — the motor and barrel quality is the difference between 6 weeks of smooth tumbling and constant fixes. Top 10 tested rotary tumblers
Before you load a single rock, gather everything. Running out of grit mid-cycle means starting that stage over from scratch.
The essentials:
- A rotary rock tumbler – The National Geographic Hobby Rock Tumbler Kit comes with everything including grit, or the Lortone 3A (Tru-square) is the gold standard for serious hobbyists
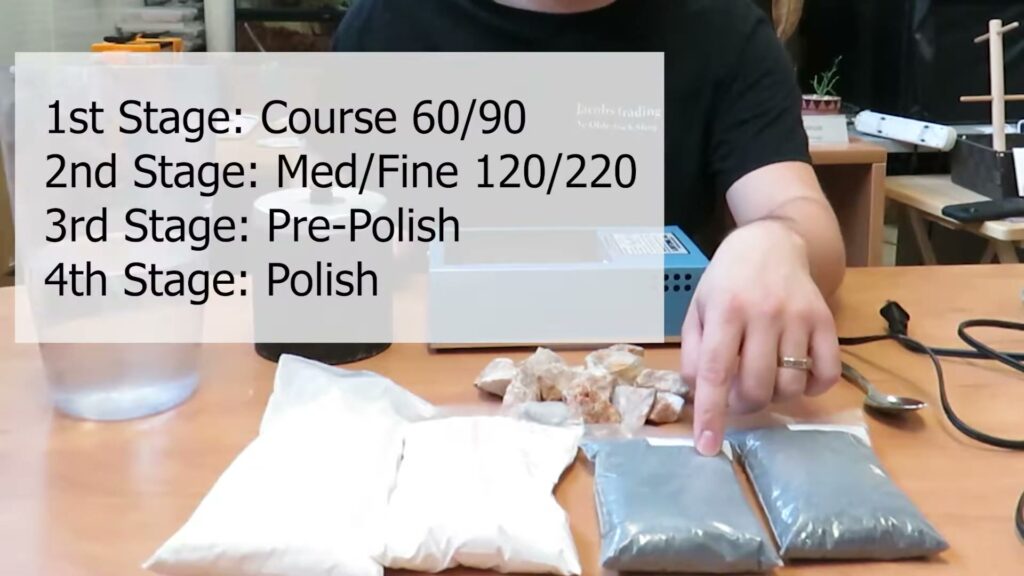
- Silicon carbide grit – You need four grades: 60/90 coarse, 120/220 medium, 500 pre-polish, and aluminum oxide or cerium oxide polish
- Ceramic tumbling media – Small ceramic cylinders that fill gaps between rocks and improve the tumbling action
- Rocks of similar hardness – Mixing soft and hard rocks together is the number one beginner mistake. Stick to rocks in the 6-7 range on the Mohs hardness scale (jasper, agate, quartz) for your first batch
- A plastic colander or mesh strainer – For rinsing rocks between stages
- Old towels and newspaper – This gets messy
One thing most guides skip: you also need patience. Each stage runs for about 7 days. The full process takes 4-5 weeks minimum. There are no shortcuts that actually work.
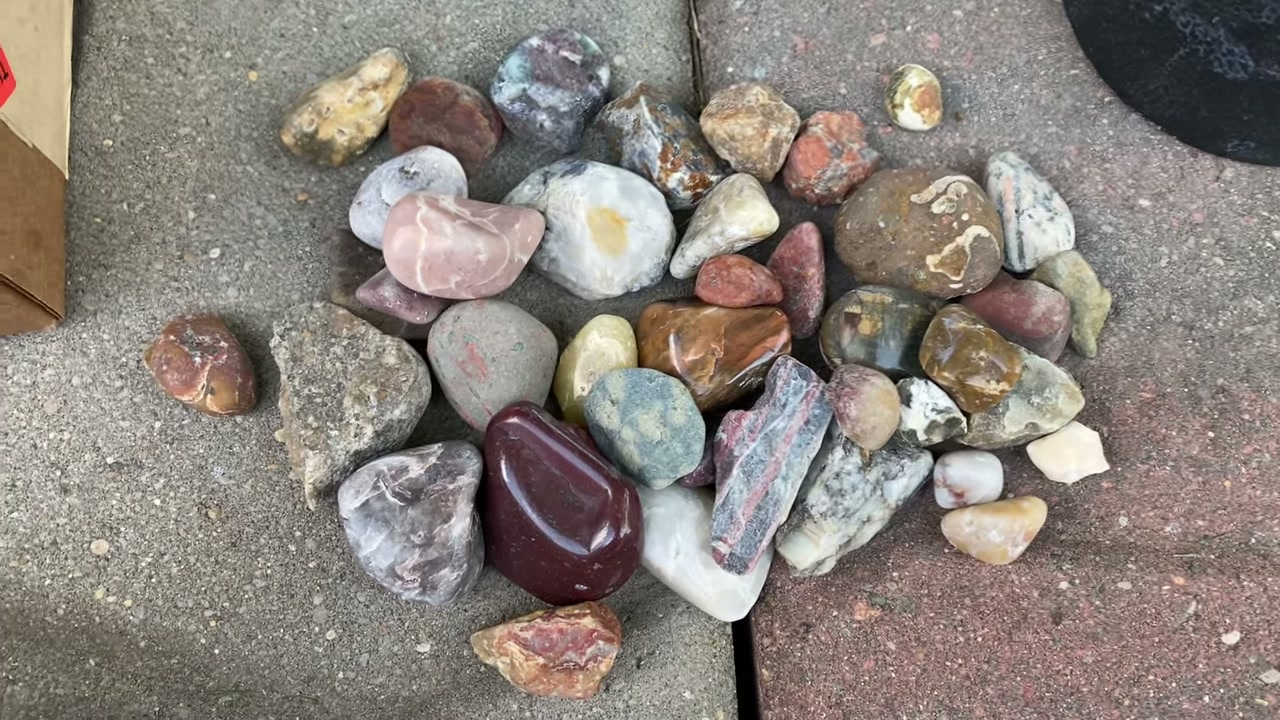
How to Select and Prepare Your Rocks
Not every rock belongs in a tumbler. Grab that mentality now and save yourself weeks of disappointment.
Good tumbling rocks share three qualities:
- Similar hardness – All rocks in the same batch should be within one point on the Mohs scale. Mixing a 7-hardness agate with a 3-hardness calcite means the calcite dissolves before the agate even gets rounded
- No cracks or fractures – Hold rocks up to a light. Cracks mean the rock will break apart during tumbling, contaminating your entire barrel with fragments
- Roughly the same size – Include a mix of sizes (large, medium, small) but keep the biggest rock no more than 3x the size of the smallest. This creates better tumbling action
Quick prep: Scrub rocks with a brush to remove dirt and clay. Knock off any sharp points that could damage the barrel lining. Fill the barrel about 2/3 to 3/4 full with rocks, then add ceramic media to fill gaps. The barrel needs to be at least 2/3 full for proper tumbling action, but never more than 3/4.
Not sure which rocks work best? Our guide on how to identify rocks suitable for tumbling covers everything from field testing to the scratch test.
Stage 1: Coarse Grind (60/90 Grit) – 7 Days
This is where the heavy shaping happens. Coarse grit is basically industrial sandpaper in powder form, and it grinds down rough edges, removes pits, and starts shaping your rocks into smooth forms.
Step by step:
- Load rocks and ceramic media into the barrel (2/3 to 3/4 full)
- Add 2 tablespoons of 60/90 coarse grit per pound of rock. For a 3-pound barrel, that’s about 6 tablespoons
- Add water until it just reaches the bottom of the top layer of rocks. Not higher. Too much water dilutes the grit and slows the grinding
- Seal the barrel tight, place it on the tumbler, and turn it on
- Check after 24 hours – open carefully (pressure builds up from gas). The slurry should look like thick gray mud. If it’s watery, add a pinch more grit
- Run for 7 full days

What to watch for: After 7 days, your rocks should feel noticeably smoother. All sharp edges should be gone. If rocks still have rough spots or deep pits, run them for another 3-4 days with fresh grit and water. Never reuse grit from a previous stage.
Critical cleaning step: When the stage is done, dump the slurry (never down the drain – it will clog your pipes). Rinse every rock individually under running water. Rinse the barrel. Rinse the lid. Even a single grain of coarse grit carried into Stage 2 will scratch your rocks and ruin weeks of work.
This cleaning step is where most beginners fail. If you learn nothing else from this guide, learn this: clean like your results depend on it, because they do.
Stage 2: Medium Grind (120/220 Grit) – 7 Days
The medium grind smooths out the scratches left by Stage 1. Your rocks go from rough-smooth to actually-smooth.
The process is identical to Stage 1: load rocks, add 2 tablespoons of 120/220 grit per pound, add water to the same level, seal, and run for 7 days.
After this stage, rocks should feel smooth to the touch with no visible scratches (you might need a magnifying glass to check). The surface won’t be shiny yet, but it should be uniformly matte with no rough patches.
Same critical rule applies: rinse everything obsessively between stages. Every rock, the barrel interior, the lid gasket, your hands. One stray coarse grit particle ruins the whole batch.
Want to understand why each grit grade matters so much? Our guide to rock tumbling grit breaks down the science behind silicon carbide abrasives.
Stage 3: Pre-Polish (500 Grit) – 7 Days
Here’s where it starts getting exciting. Pre-polish removes the fine scratches from Stage 2 and prepares the surface for the final polish.
Same procedure: 2 tablespoons of 500-grit (sometimes labeled “pre-polish”) per pound of rock, water to the right level, 7 days of tumbling.
After this stage, your rocks should have a slight sheen. They won’t be glossy yet, but you’ll start to see color and pattern details emerging. Pick up a rock, hold it to the light – you should see the beginning of what it’s going to become.
If rocks look dull or feel gritty at all after this stage, repeat it. Pushing forward with imperfect rocks just wastes Stage 4 polish.
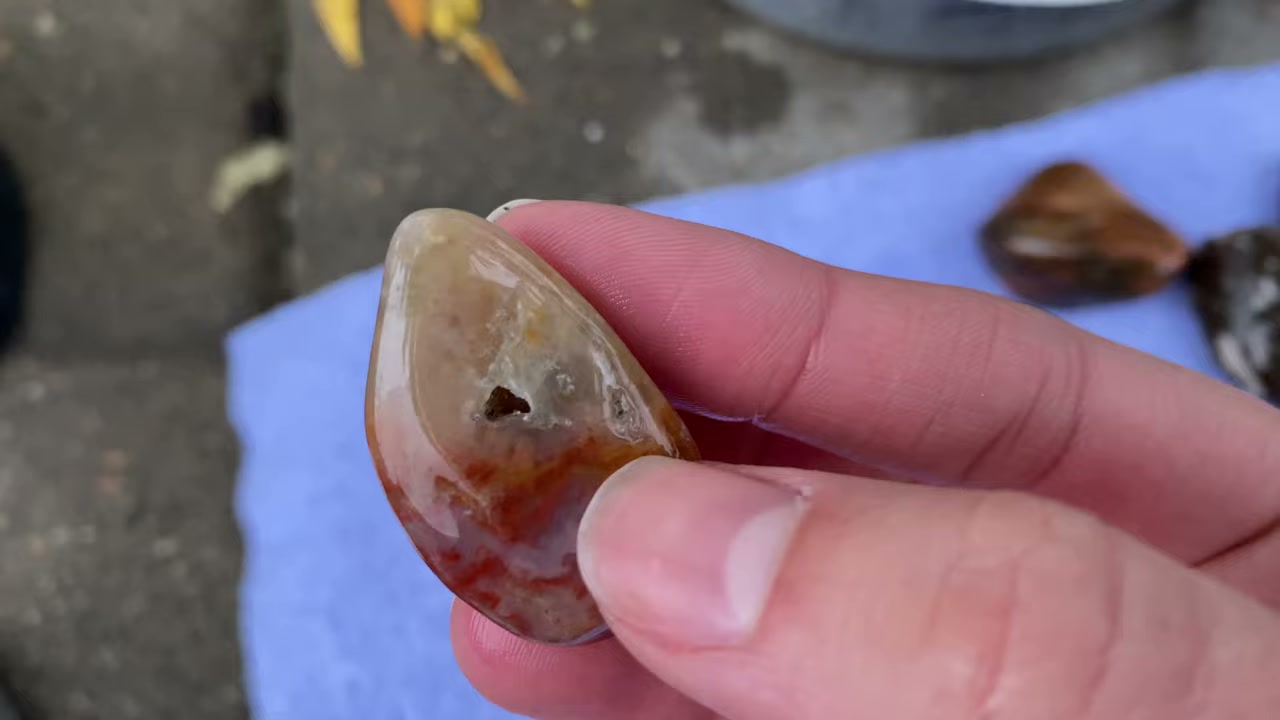
Stage 4: Final Polish – 7 Days
This is the stage everyone waits for. Your rocks go from “pretty nice” to “wait, I made THAT?”
Final polish uses a much finer compound – typically aluminum oxide (for most rocks) or cerium oxide (especially good for quartz and agate). The process is the same as previous stages, but with one key difference: add a tablespoon of sugar or a small piece of an old bar of Ivory soap to the barrel. This creates a cushioning slurry that prevents micro-scratches during polishing.
After 7 days, open the barrel and prepare to be amazed. Your rocks should have a glass-like shine. Colors that were invisible in the rough stone suddenly pop. Banding patterns in agate, the deep green of jasper, the swirl of crazy lace – it all comes alive.
Not happy with the shine? Run another 3-4 days. Some rocks, especially softer ones, benefit from extra polish time.
Burnishing: The Optional Fifth Stage
Burnishing isn’t technically required, but it cleans the polish residue off your rocks and gives them that final “wet look” gleam.
Load your polished rocks back in the barrel with ceramic media and clean water. Add a tiny bit of grated Ivory soap (about half a teaspoon). Run for 24-48 hours. That’s it.
The result? Rocks that look like they’re permanently wet. That’s the gold standard for tumbled stones.
7 Mistakes That Ruin a Batch (And How to Avoid Them)
These come straight from years of trial and error, plus every “what went wrong” post on r/RockTumbling:
- Mixing rock hardnesses – Softer rocks dissolve while harder ones barely change. Sort by Mohs hardness before loading
- Rushing between stages – If rocks aren’t perfectly smooth for that stage, repeat it. Advancing too early means scratches you can never remove
- Sloppy cleaning between stages – This deserves repeating. One coarse grit particle in your polish stage can scratch every rock in the barrel
- Overfilling the barrel – Rocks need room to tumble freely. Over 3/4 full means rocks slide instead of tumble, and you get flat spots
- Underfilling the barrel – Below 2/3 full and rocks slam into each other instead of gently rolling. Use ceramic media to fill the difference
- Pouring slurry down the drain – Rock slurry is basically liquid concrete. It will destroy your plumbing. Dump it in the garden or trash
- Using the wrong rocks for your first batch – Start with jasper, agate, or similar quartz-family rocks. Save the soft stuff (obsidian, fluorite) for when you know the process
Running into cloudy results even after following every step? Our troubleshooting guide for cloudy polished rocks walks through every possible cause and fix.
How Long Does the Entire Rock Tumbling Process Take?
The standard timeline for a rotary tumbler:
| Stage | Duration | Grit |
|---|---|---|
| Stage 1: Coarse Grind | 7 days | 60/90 silicon carbide |
| Stage 2: Medium Grind | 7 days | 120/220 silicon carbide |
| Stage 3: Pre-Polish | 7 days | 500 silicon carbide |
| Stage 4: Final Polish | 7 days | Aluminum oxide |
| Burnishing (optional) | 1-2 days | Soap only |
Total: 28-30 days minimum. Budget extra time if any stage needs repeating. Vibratory tumblers are faster (the polish stage can take just 24-48 hours), but rotary tumblers do the heavy shaping work better. Some hobbyists use a rotary for Stages 1-2 and a vibratory for Stages 3-4 to get the best of both worlds. Our hybrid tumbling guide covers this approach in detail.
Pro Tips from Experienced Tumblers
After tumbling hundreds of batches, here’s what separates good results from great ones:
- Keep a tumbling journal. Write down what rocks you used, how long each stage ran, and how they turned out. You’ll spot patterns fast
- Save your best rocks for later. Don’t put your prize specimen in your first batch. Practice on cheaper rough first
- Check the barrel daily. Listen for changes in sound. A healthy barrel has a smooth, rolling sound. Grinding or clunking means something is wrong
- Buy extra grit. You will repeat stages. Having extra grit on hand means you don’t have to wait for an Amazon delivery mid-batch
- Temperature matters. Extremely cold garages can slow the tumbling action. Room temperature (65-75F) is ideal
- Label your barrels. If you run multiple batches, label each barrel with the rock type, stage number, and start date. Future you will be grateful
Frequently Asked Questions
Can I tumble rocks I found at the beach?
Yes, but be selective. Beach rocks are often already partially smoothed by wave action, which means Stage 1 may run shorter. The challenge is identifying what type of rock you have – beach rocks can be anything from granite (works great) to limestone (too soft). Do a scratch test: if it scratches glass, it’s hard enough to tumble well.
Why do my tumbled rocks look shiny wet but dull when they dry?
This usually means Stage 3 or Stage 4 wasn’t run long enough, or cross-contamination happened between stages. The fix: re-run the pre-polish and polish stages with meticulous cleaning between them. Adding a burnishing stage also helps lock in that wet-look shine permanently.
Do I need to run the tumbler 24/7?
Yes. Turning the tumbler off and on creates flat spots on your rocks where they sat stationary. Once you start a stage, let it run continuously until it’s done. Most tumblers use about the same electricity as a light bulb, so the power cost is minimal.
Can I reuse tumbling grit?
No. Used grit breaks down into finer particles during tumbling – that’s how it works. Reusing Stage 1 grit means you’re actually running a finer-than-intended grind, which throws off the whole process. Fresh grit for every stage, every time.
What’s the cheapest way to get started?
A beginner tumbler kit with grit included is the best value. The National Geographic kit comes with a tumbler, grit, rough rocks, and jewelry settings for under $50. After that, bulk grit refills are the main ongoing cost – about $10-15 per batch. Check our best rock tumbler for beginners guide for a full comparison.
What to Do with Your Polished Rocks
You’ve spent a month turning rough stones into polished gems. Now what?
Most people start a collection display – and it grows fast once you get addicted. Wire-wrapped jewelry, shadow boxes, clear jars as decoration, or just a bowl on the coffee table that makes every guest pick one up and say “wait, you MADE these?”
For display inspiration, check out our 10 creative ideas for displaying tumbled rocks. If you want to take your finish to the next level, our post-tumble enhancement guide covers sealants and coatings that make polished rocks really pop.
The first batch is always the hardest. You’ll second-guess every step, check the barrel obsessively, and probably clean between stages three times more than necessary. That’s fine. By batch two or three, the process becomes second nature, and you’ll start experimenting with different rocks, longer run times, and mixed media techniques.
Pick up some rough agate or jasper, load that barrel, and get tumbling. Four weeks from now, you’ll have a handful of polished stones that look like they came from a gem shop. Trust the process.